Guide for Modelers
Supporting Documents Section
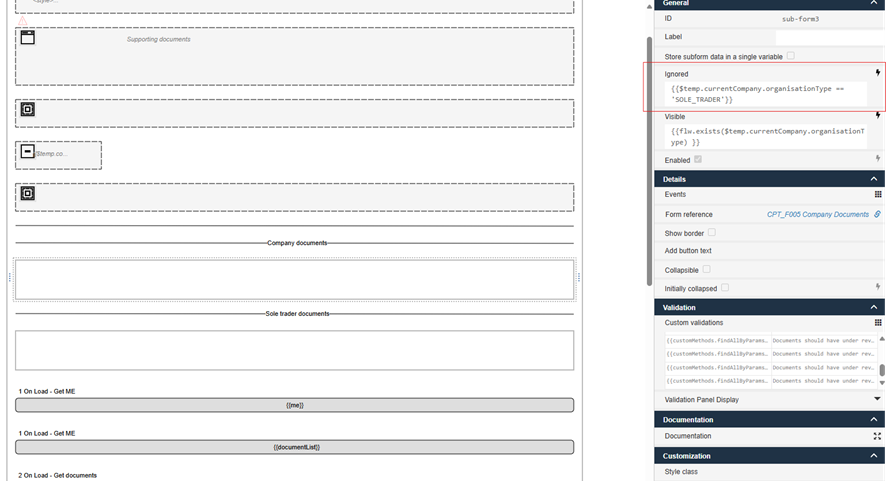
The Supporting Documents page includes two subforms:
- Company / Business Entity documents
- Sole Trader documents
Each subform is conditionally displayed based on the organization type. For example, for Business Entity/Company following ignored condition it is used:
{{$temp.currentCompany.organisationType == 'SOLE_TRADER'}}
Adding a New File Section
KYB documents from the Supporting Documents section can be added or removed with the provided Document Types
Possible Document Types to Be Collected:
Legislation Country | Business Type | KYB Document Label | Toqio DB Document Type | Included in the template | Mandatory in the template (at Least 1 File) | Max Files | Max Size (MB) |
|---|---|---|---|---|---|---|---|
Spain | Business Entity | Escritura de composición | ESCRITURAS | ✅ | ✅ | 5 | 15 |
CIF / NIF | CIF | ❌ | |||||
Acta de titularidad real | CERTIFICADO_DE_TITULARIDAD_REAL | ✅ | ✅ | 5 | 15 | ||
DNI administradores del consejo delegado | BOARD_MEMBER_IDENTITY_DOCUMENT | ✅ | ✅ | 10 | 15 | ||
DNI titulares reales | UBO_IDENTITY_DOCUMENT | ✅ | ✅ | 10 | 15 | ||
Poder y DNI del firmante | POWER_OF_ATTORNEY | ✅ | ❌ | 10 | 15 | ||
Certificado de titularidad de cuenta bancaria | BANK_ACCOUNT_OWNERSHIP_CERTIFICATE | ✅ | ✅ | 1 | 15 | ||
Estructura del órgano de Administración | ADMINISTRATIVE_STRUCTURE | ❌ | |||||
Cuentas anuales | ANNUAL_ACCOUNTS | ❌ | |||||
Other documents | OTHER | ✅ | ❌ | 10 | 15 | ||
Spain | Sole Trader | Modelo 036 o 037 | TAX_REGISTRATION_CERTIFICATE | ✅ | ✅ | 1 | 15 |
Recibo de pago última cuota autónomos | SELF_EMPLOYMENT_TAX_RECEIPT | ✅ | ✅ | 1 | 15 | ||
Certificado de titularidad de cuenta bancaria | BANK_ACCOUNT_OWNERSHIP_CERTIFICATE | ✅ | ✅ | 1 | 15 | ||
Other documents | OTHER | ✅ | ❌ | 1 | 15 | ||
UK | Business Entity | Proof of Shareholders Structure | PROOF_OF_SHAREHOLDER_STRUCTURE | ❌ | |||
Articles Incorporation Memorandum Association | ARTICLES_INCORPORATION_MEMORANDUM_ASSOCIATION | ❌ | |||||
Other documents | OTHER_SUPPORTING_DOCUMENTS | ❌ |
Table Definitions:
- Legislation Country → KYB documents are determined based on the merchant's legislation country.
- Business Type → KYB documents can be defined based on the business type (e.g., Business Entity or Sole Trader). This is regulated by the template and can be modified if needed.
- KYB Document Label → The name of the KYB document. Can be custom in the template.
- Document Type → The specific type of document collected. Defined on the Toqio database level.
- Mandatory (At Least 1 File) → This requirement is defined in the template and can be modified if needed.
- Max Files That Can Be Uploaded → The maximum number of files allowed for a document type. This parameter can be modified. Changing this setting is not recommended, as it support KYB documents reusability.
- Max File Size (MB) → The maximum size limit per file. Changing this setting is not recommended, as it may cause errors. File size validation: Images Max - 10 MB, PDF Max - 15 mb
Note: KYB documents are stored and managed at the provider level and can be reused across onboarding journeys.If a Merchant is undergoing verification with multiple providers, they do not need to upload the same KYB document type separately for each provider. The most recent version of the document will be used if configured and available. Reusability configuration is managed by our delivery team for each provider.
Merchants can also remove a document from the form and upload an updated version if needed.
Adding a new file section
If you want to add a new section to one of the required subforms (F005 or F006). You can use an existing subform as a reference.
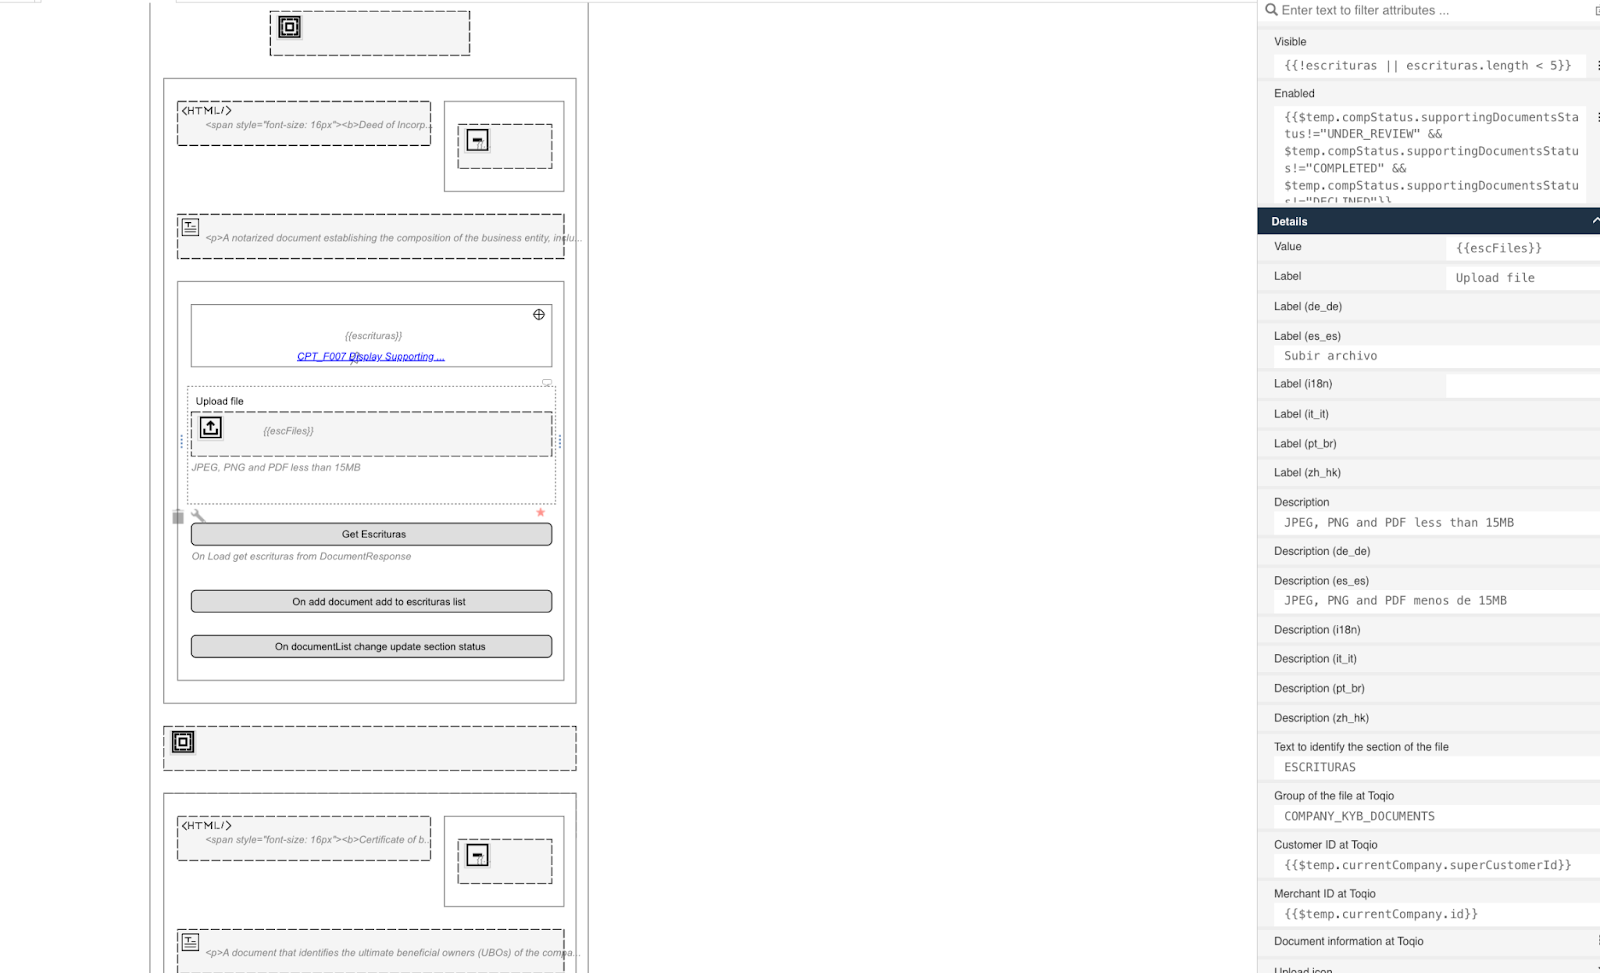
A new file section includes:
- Title & Description
- Section Status
- File Upload Component
- Subform for Displaying Multiple Documents
The expression buttons below are used to:
- Filter documents by category
- Add uploaded documents to the list
- Update the section status
You can only use document types listed in the table above. To include a custom document type, use OTHER and update the label accordingly.
All new variables you define will later be required in the Display Supporting Document Subform (F007).
Uploading & Displaying Documents
Custom Components Used:
- File Upload
- File - displays file lists & manages download/removal actions
For a new File section:
- Define the document category in the File Upload Component
- Set the number of required documents

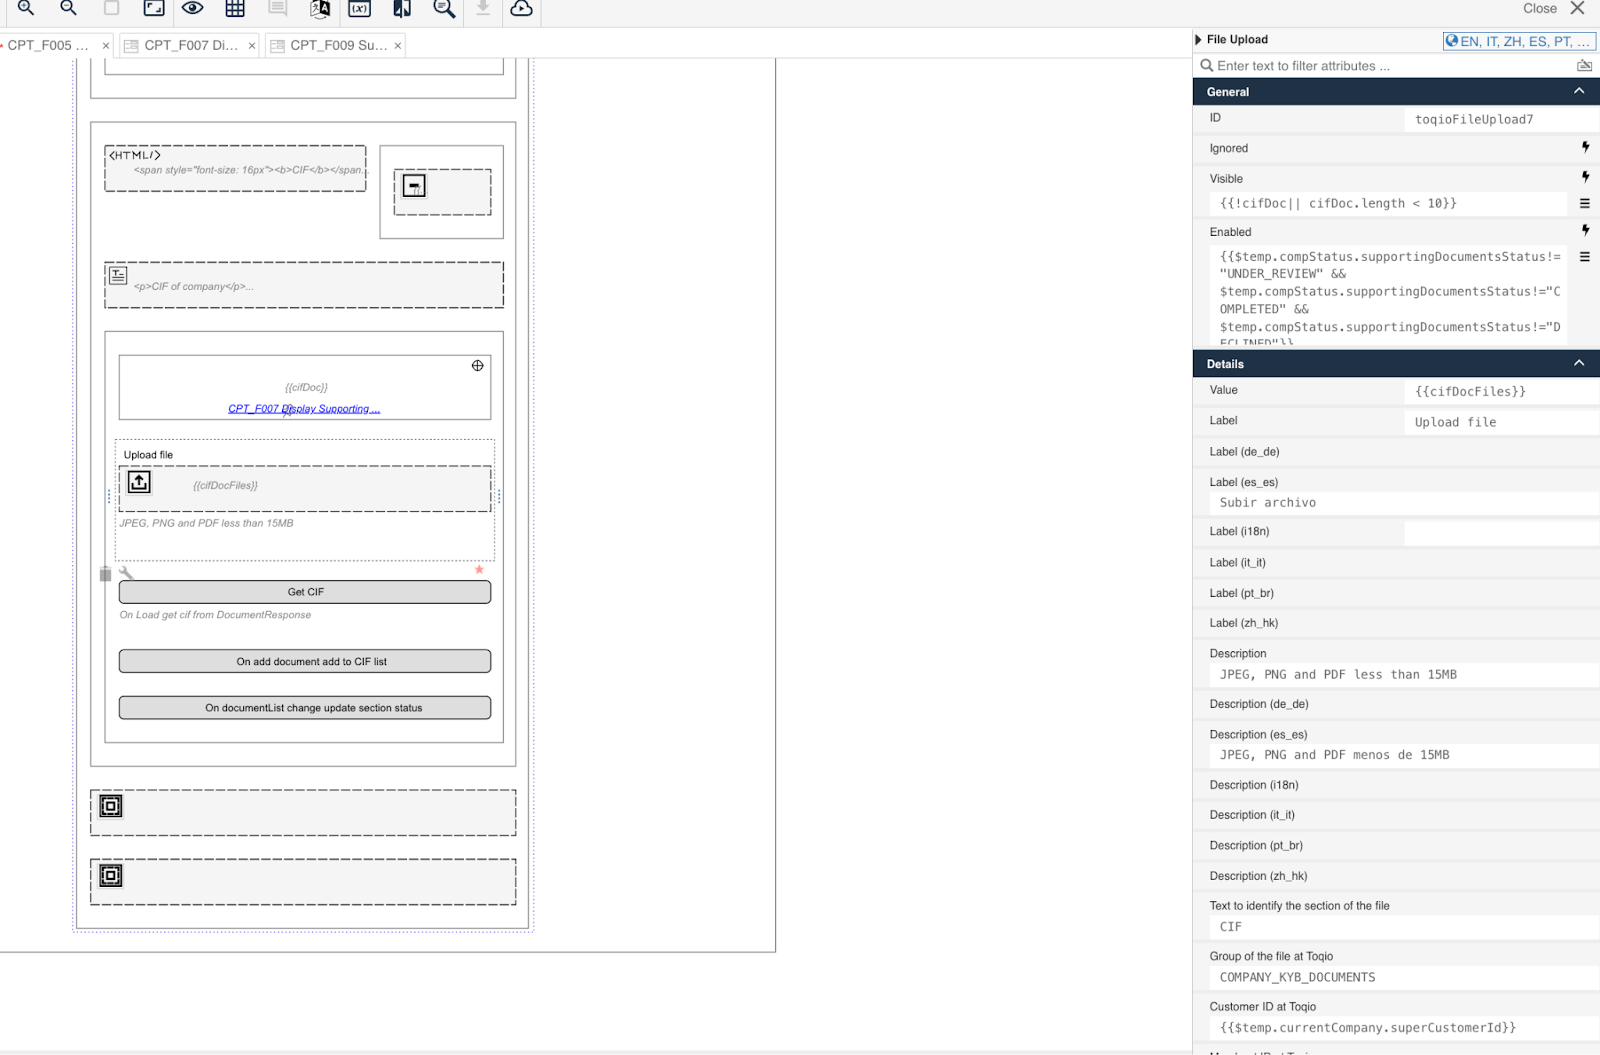
- value - in the image above the value looks like: {{esc Files}} . You should change it for your variable for saving the information of the uploaded file. Example: {{cifDocFiles}}
- visible - the visibility condition limits how many files can be uploaded. For example: {{!escrituras || escrituras.length < 5}} . Change it to reflect your new variable and file limit. Example for CIF document (max 3 files): {{!cifDoc || cifDoc.length < 3}}.
- text to identify the section - the original label in our example is ESCRITURAS, replace it with your new document type. Example: Use CIF to match your document type.
After updating the component, your File Upload section should look similar to this:
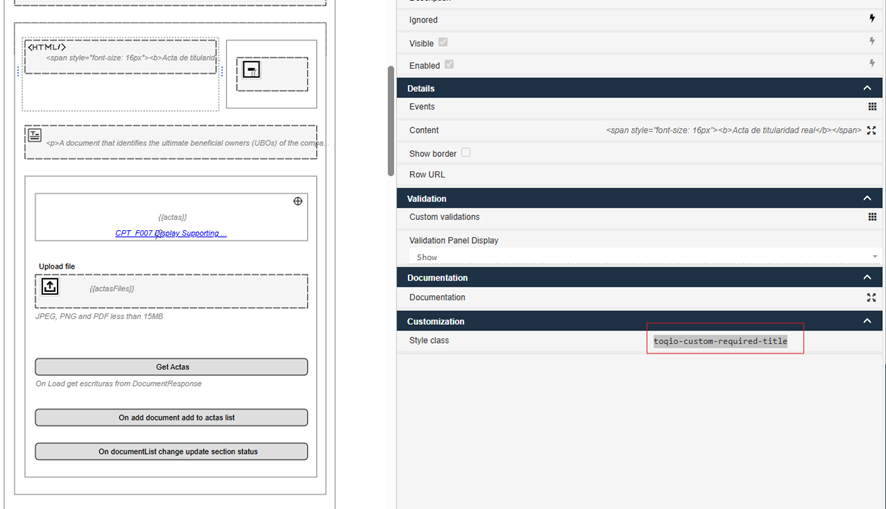
- If this section is optional, remove the**
toqio-custom-required-title**from the title’s style class.
Supporting Document Subform
Now, let us go deep inside the Display Supporting Document subform (F007).
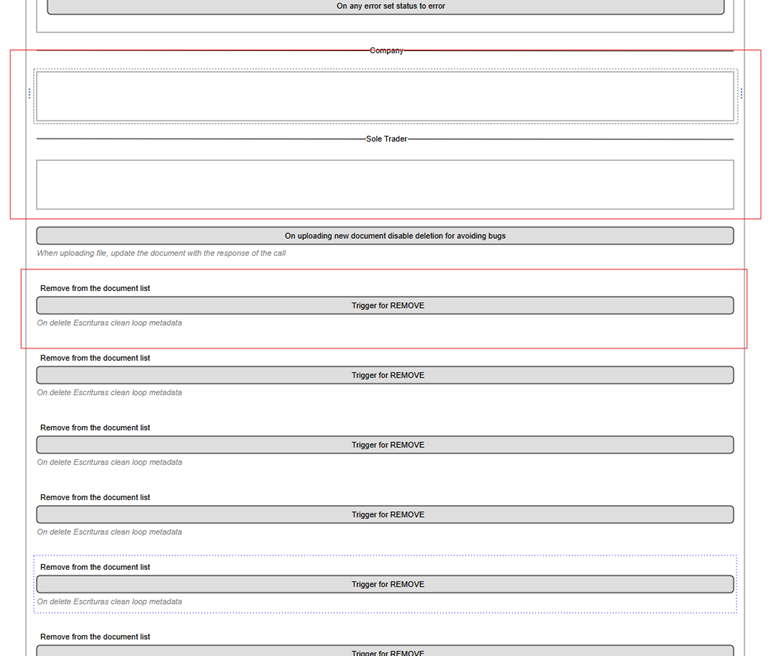
This is what the section would look like in our example using the CIF document:
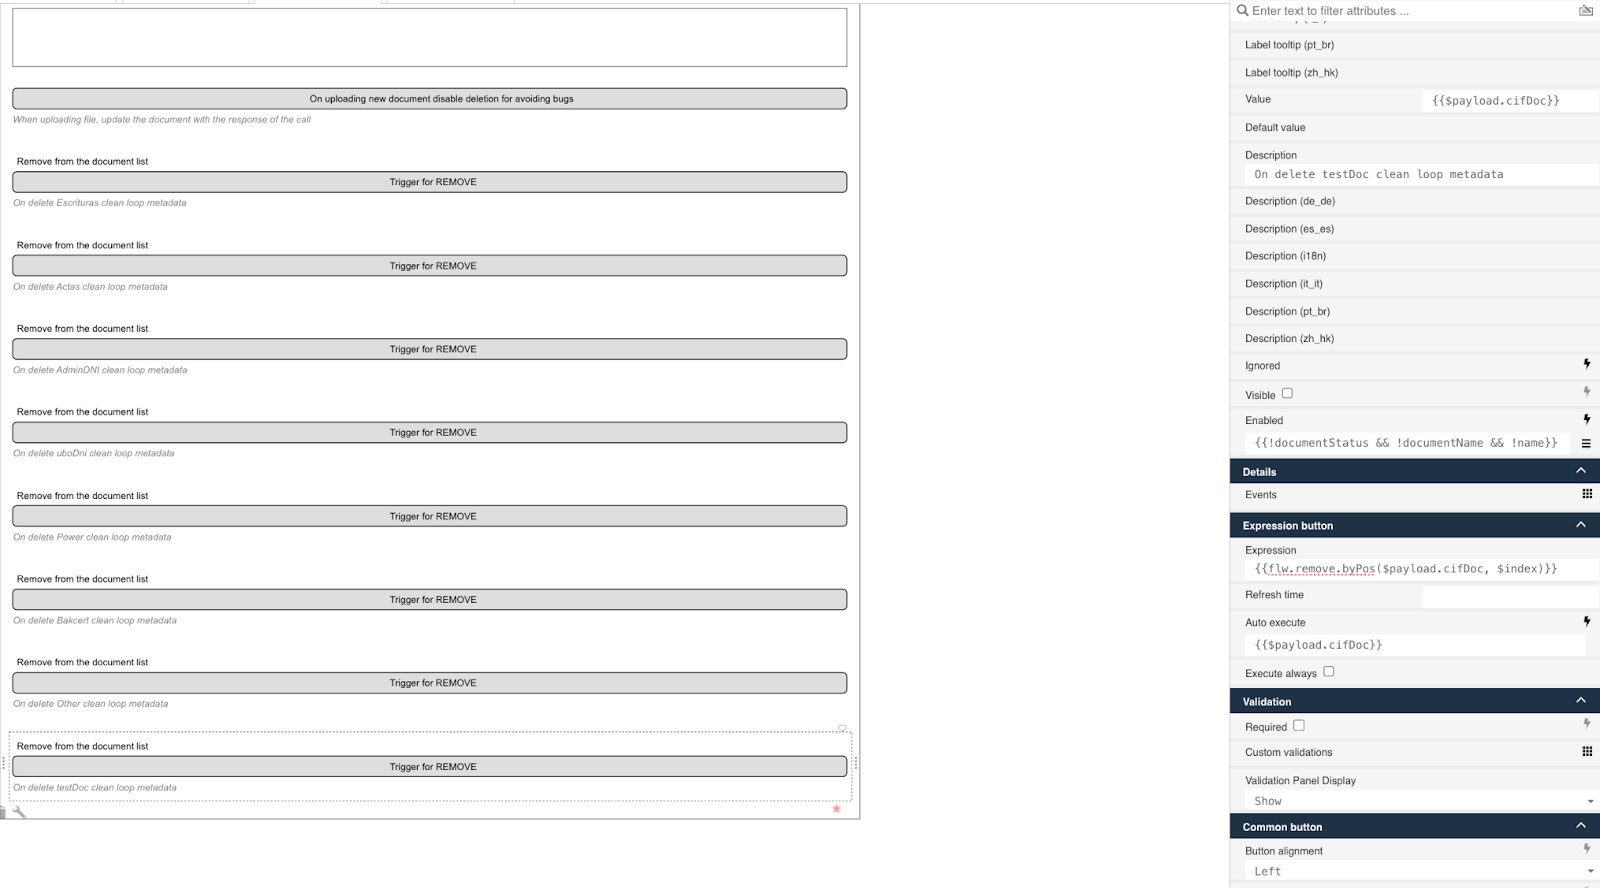
1. Implementing the trigger for Remove action
When removing an object from an array, unintended issues can occur where button expressions execute incorrectly, causing data inconsistencies.
Solution: Implement a remove action trigger to ensure data consistency when deleting files.
Example of an Array Issue: If we have the following array: [{a:1,b:1}, {a:2,b:2}, {a:3,b:3}] Removing {a:2,b:2} leaves data like this [{a:1,b:1}, {a:3,b:3}, {b:3}] because on reducing the length to 2, expression button is auto executed in array index 2 in an uncontrolled way.
Issue: When the length reduces to 2, the expression button auto-executes at index 2, leading to unintended behavior.
Fix: Add a custom trigger to properly handle the remove action, ensuring that data updates only affect the intended array elements.
2. Adding Logic to Required Subforms (F008 or F009)
To ensure proper handling of uploaded documents, you must modify the logic in one of the required subforms.
- Use an existing panel as a reference (e.g., Business Entity Documents or Sole Trader Documents).
- Modify expressions to ensure correct document handling and updates.
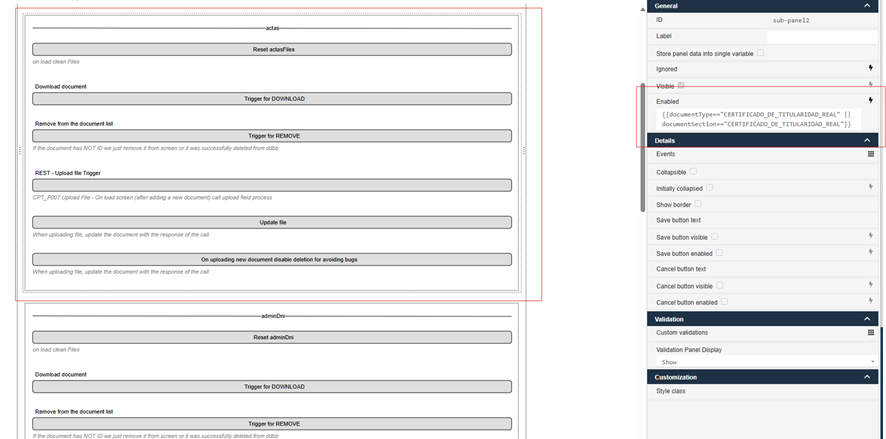
3. Configuring buttons & expressions
After adding a new panel, you need to:
- Configure expression buttons & REST buttons using the variables defined earlier in Business Entity Documents or Sole Trader Documents forms.
- Ensure the correct data mappings to prevent inconsistencies.
- Apply enabled conditions to control the visibility of the panel.
For our example with CIF it would look like this:
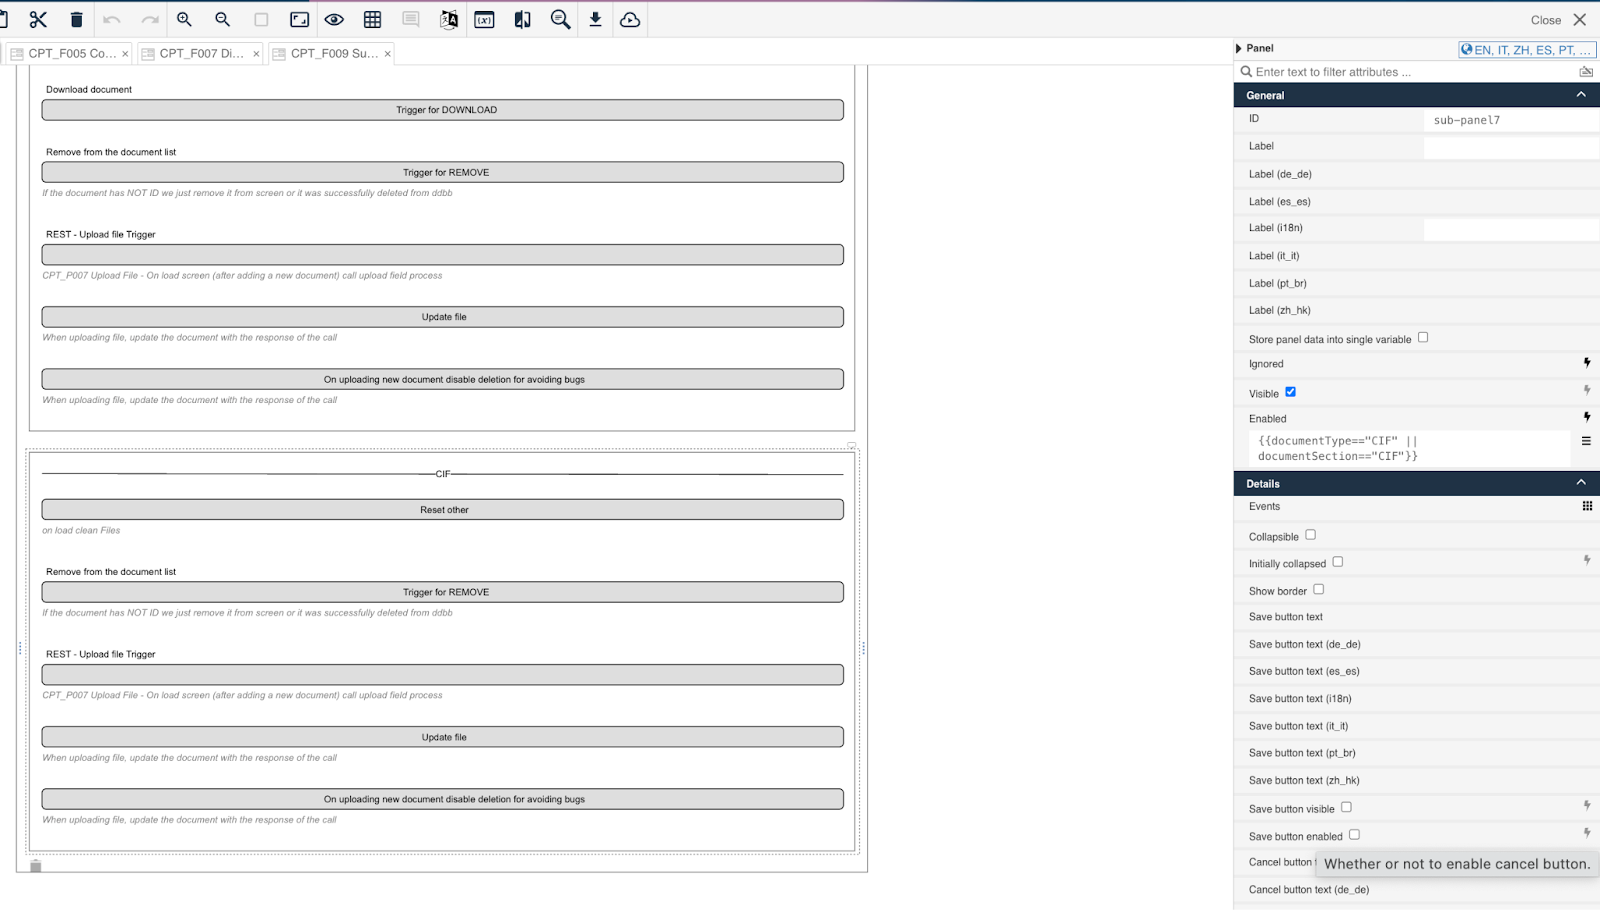
4. Adding Custom Validations
Once the panel and buttons are correctly set up, the final step is to add custom validations to the Supporting Documents Page (PG005 or PG007 depending on the business type).
Validation ensures that:
- Users cannot submit incomplete or invalid files.
- Required documents are uploaded before proceeding.
- The correct number of files is maintained for each document type.
Recommended Approach:
- Use existing validation logic as a reference.
- Modify conditions to match the new panel's requirements.
- Test to ensure the validation rules are applied correctly.


Deleting a New File Section
If you need to delete a file section, you can remove the entire panel from the following forms:
CPT_F005— Company DocumentsCPT_F006— Sole Trader Documents
As an example, this is done when removing the document type OTHER.
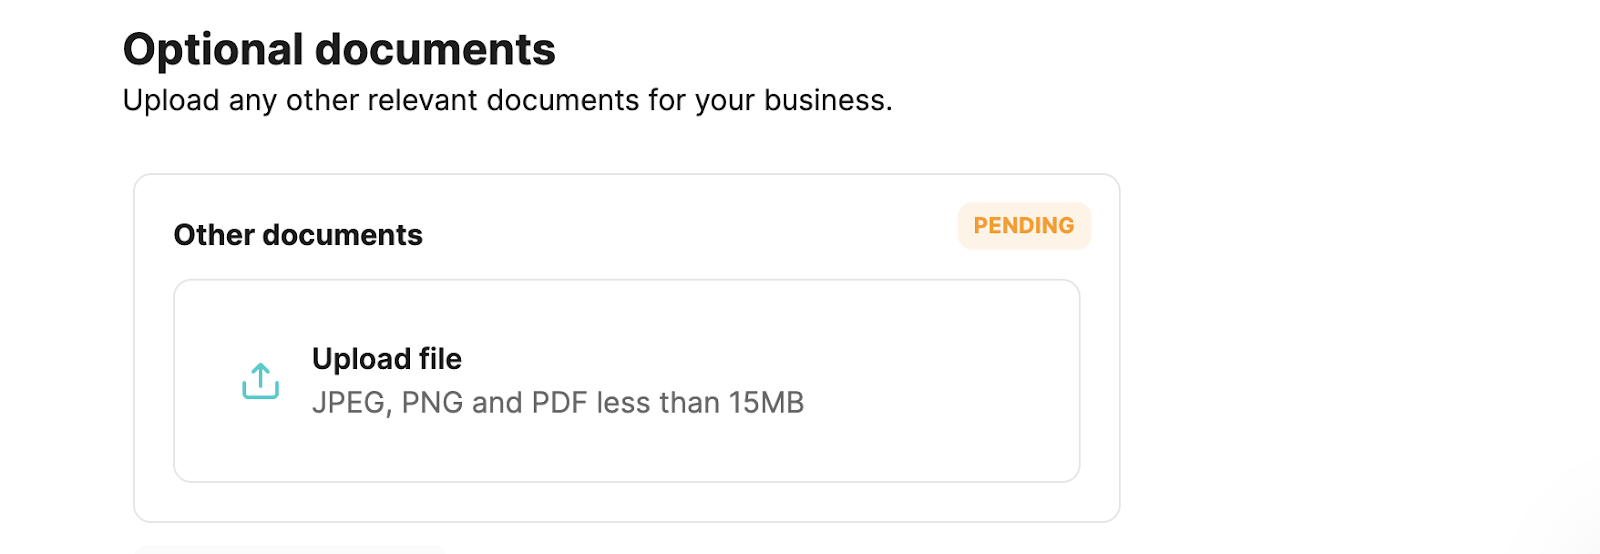
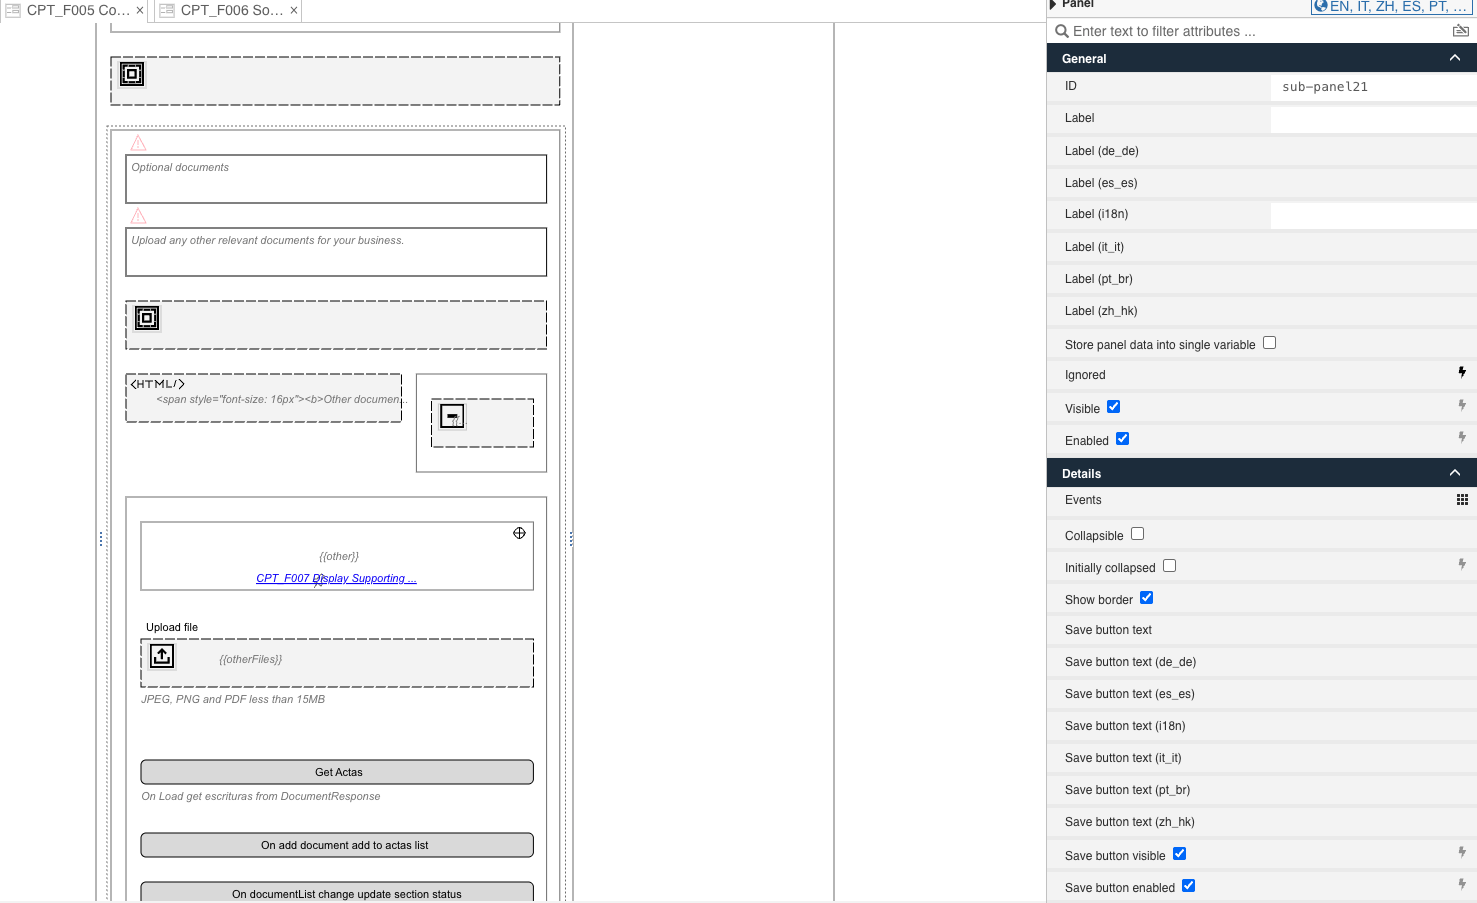
So in order to do that you need to remove the entire panel in this case sub-panel21. This will enable the confirm button to be activated once you upload the rest of documents
Managing Data & API Endpoints
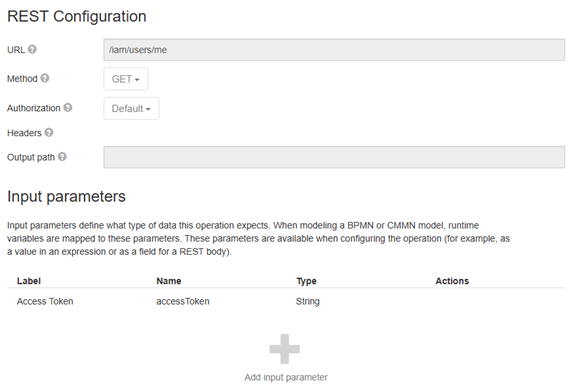
Fetching User Data
- Triggered via: REST button invoking the
C_P012process. - REST configuration:
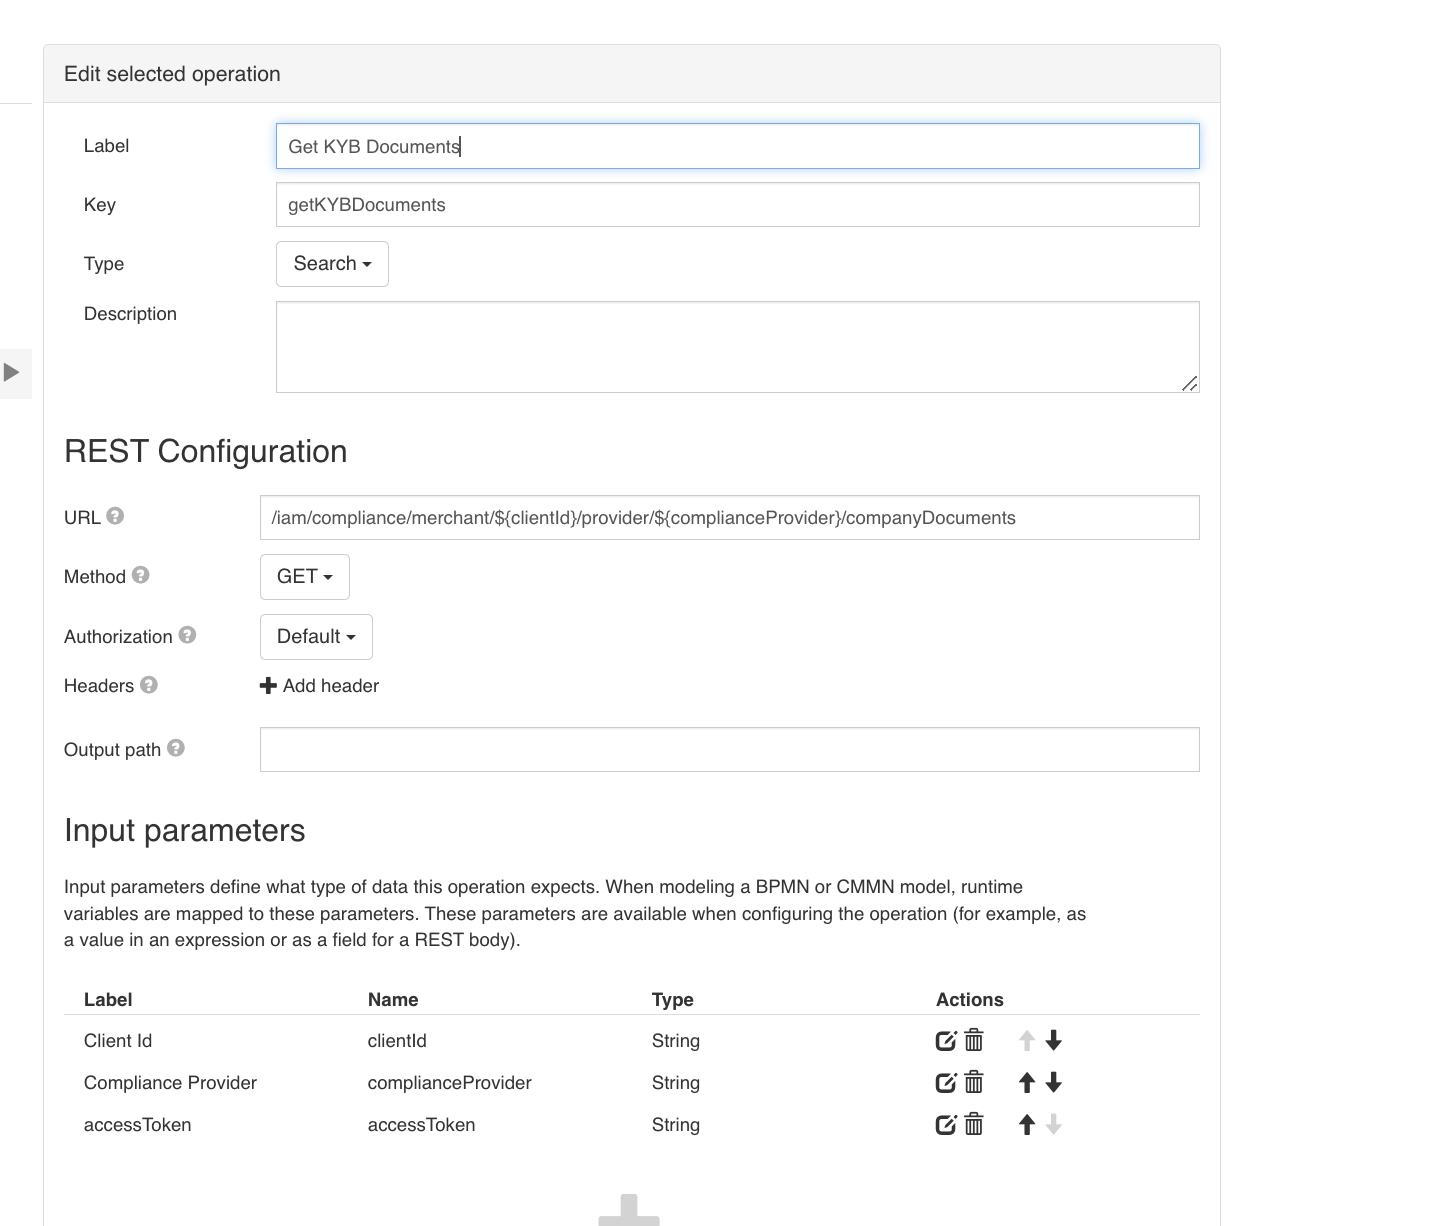
Fetching KYB Document List
- Triggered via the
CPT_P009process. - Requirement: The Client (Merchant) ID must be provided.
- REST configuration:
Fetching Merchant Data
- Triggered via the
C_P013process. - REST configuration:
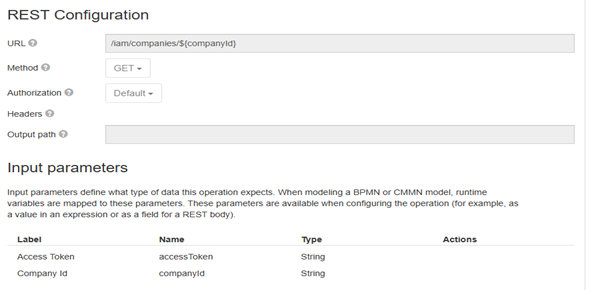
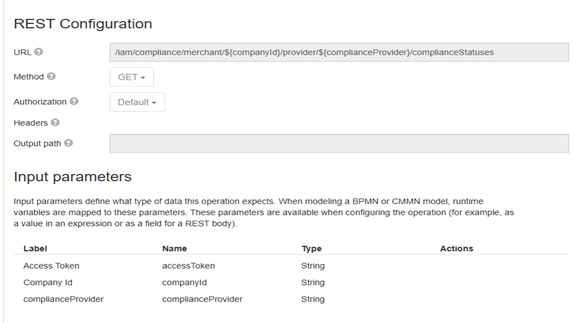
Fetching Compliance Status for the Section validation component
- Triggered via: REST button invoking the
C_P014process. - Requirement: The provider name must be dynamically assigned.
- REST configuration:
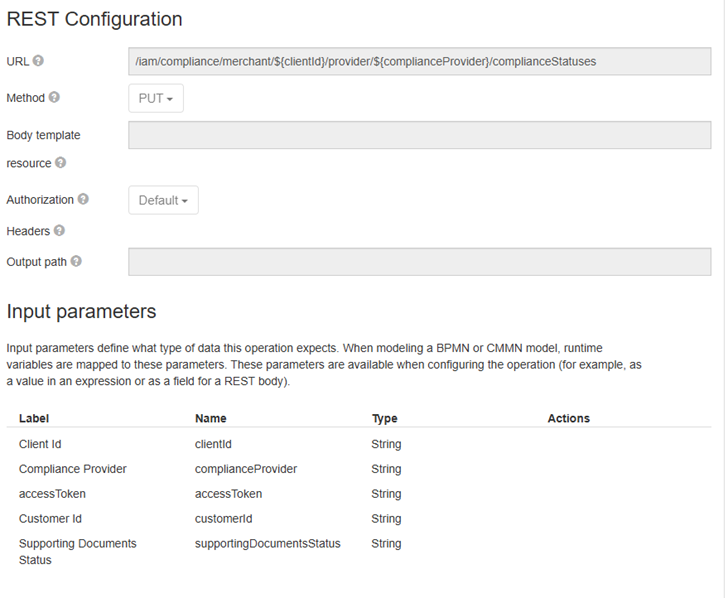
Updating section status: changing section status to "Under Review"
- Triggered via: REST button invoking the
C\_P010process. - Requirement: arguments passed
- complianceProvider
- section
- businessDetailsStatus
- personalDetailsStatus
- role
- businessType
- REST configuration:
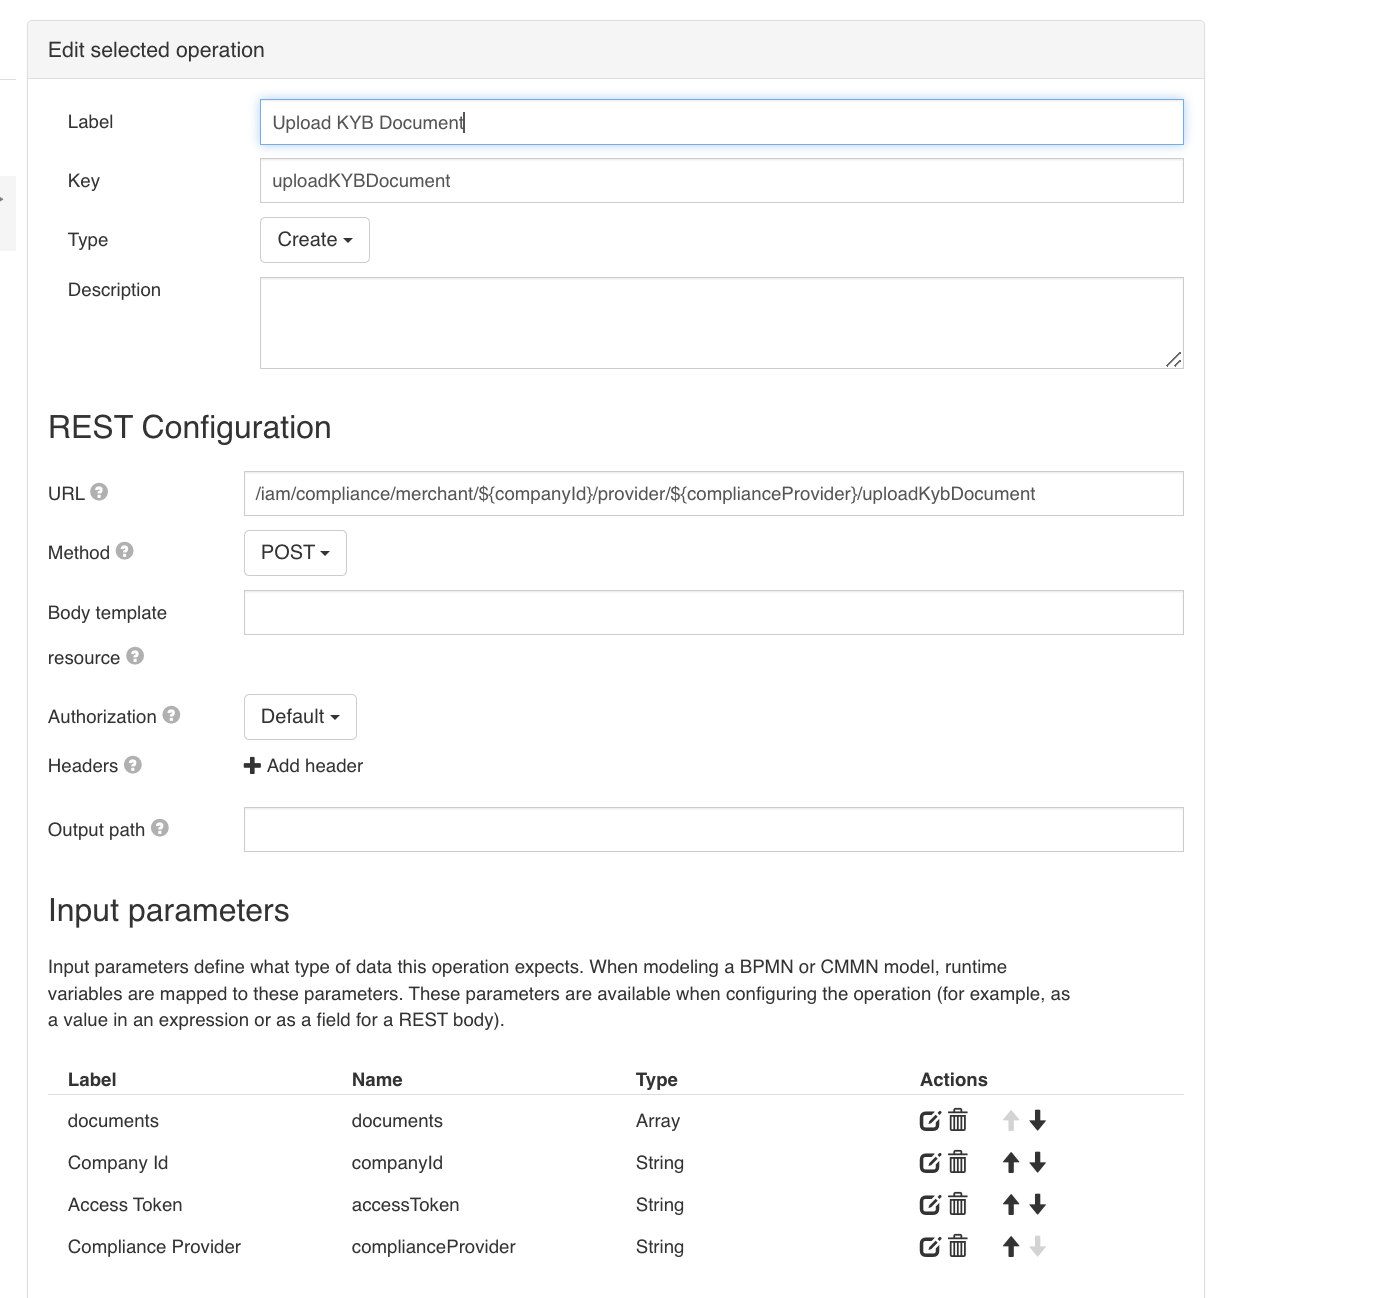
Uploading a Document
- Triggered via the
CPT_P007process. - REST configuration:
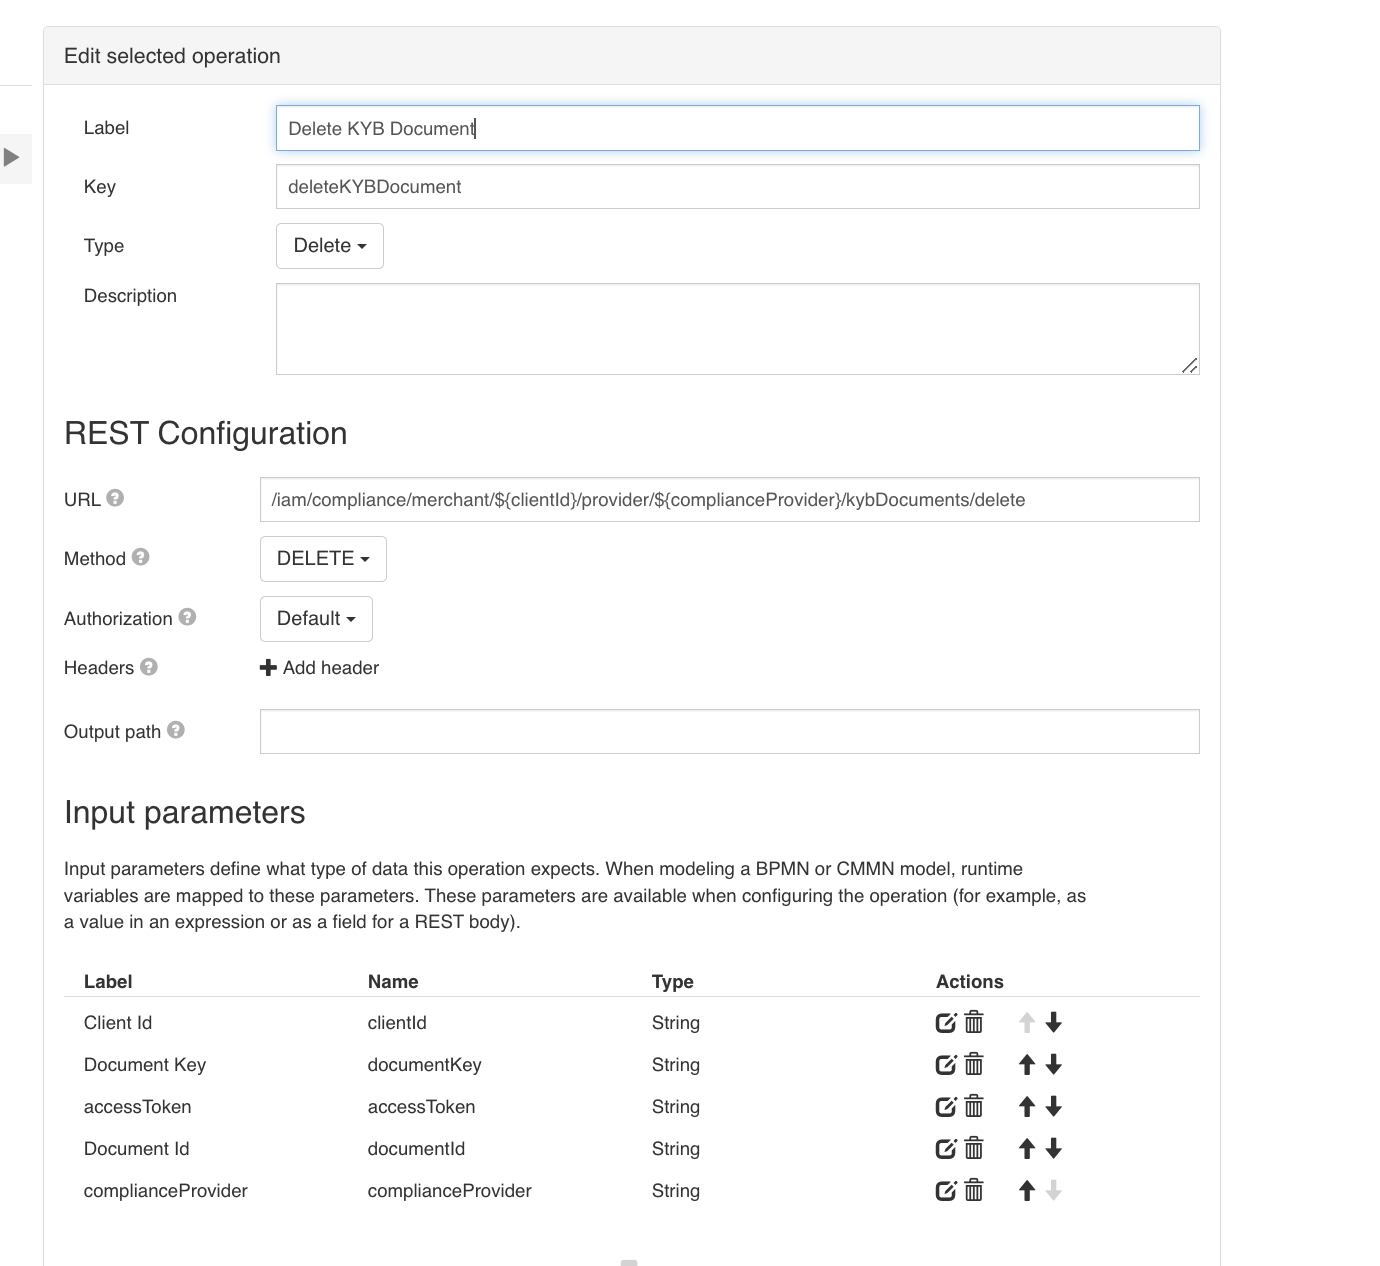
Deleting a Document
- Triggered via the
CPT_P008process. - Requirement: passed
document\_id - Method: DELETE Path: /iam/compliance/merchant/${client Id}/provider/${complianceProvider}/kybDocuments/delete
- REST configuration:
Updated 11 months ago
